
TurboStats Football Playbook Support
The TurboStats Animated Playbook is a powerful tool for the 21st century football coach. Designed by experienced coaches this state of the art product will revolutionize the way you design plays, analyze your opponents and win football games. The product is packed with advanced playbook features while still being very easy to learn and use. Using the TurboStats Animated Playbook you will be able to :
Getting Started
Before you get started using the playbook you must first install the program onto your hard drive
After the program is installed start TurboStats for Football using the Start> Program Files> TurboStats> TurboStats for Football menu
Open up any team file using the File > Open Team menu
Click on the Playbook Tab at the bottom left corner of the screen
Opening an Existing Playbook
Each time you open TurboStats for Football your last playbook file will be automatically opened. To switch from one playbook file to another use the File menu. File > Open Playbook File
Note: You must open a TurboStats Team file to access the playbook features otherwise the menu choices will be disabled
Using the Database Selector
| To quickly switch between your current playbook, Offensive Formation playbook, Defensive Formation playbook and Drills click the Database Selector pull down list. |  |
Creating a New Playbook File
| There are two ways to make playbook files: 1. File > New Playbook File will start you off with a blank playbook or 2. File > Save Playbook File As will start you off with a copy of the current playbook file. |
 |
Backing up and Sharing Playbook Files
To put a copy of your current playbook file on a floppy disk choose the File Save Playbook File As menu choice. Type in A:\Myplays or any other 8 character name. To move this file to another computer first open the playbook file from the floppy disk using File Open Playbook File and then choose File Save Playbook File As. You can also use you’re My Computer Icon or Windows Explorer to copy the playbook files which end with a .sit extension.
 |
|
The Formation Selector will pop up for you to choose your starting offensive and defensive formations
|
 |
Now that you have created a play and set your player in their starting formations you are ready to add steps.
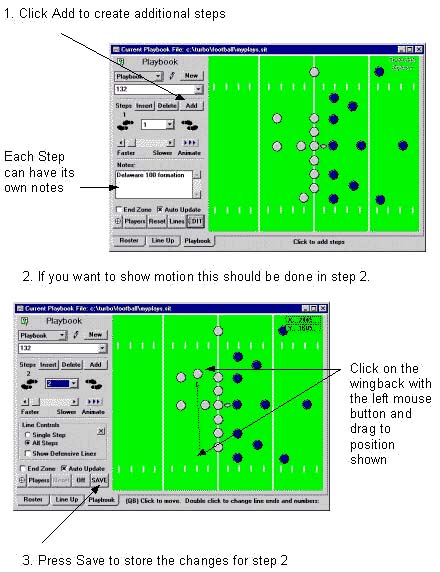
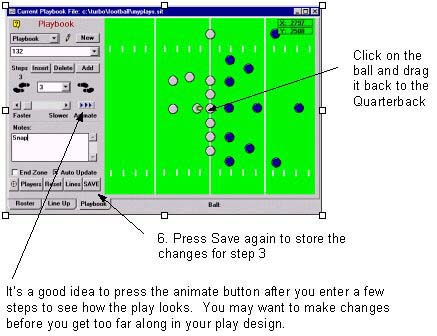
5. Now it’s time to snap the ball. It’s a good idea to create a separate step just for snapping. It makes the plays look more realistic when they are animated.
7. Press Add again to add Step 4. Did you remember?
Notice that each time you add a new step, it starts with the players in the position of the previous step. It’s important to press Add while the last step is displayed. If you happen to scroll back a few steps and then press Add you can press the Delete button, move to the last step and press Add again to correct your error.
8. Now it is time to move everyone. If your goal is to create a nice printed playbook It’s a good idea to leave the defensive players alone and only move the offense. If you want the most realistic animated playback possible then you should move everyone. Also remember to move players approximately the same distance each step. If you move any player a far greater distance they will appear to be running much faster than the other players when the play is animated.
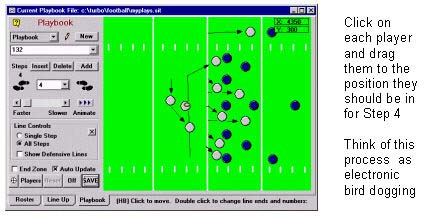
9. Press Save again when you are finished changing Step 4
Continue adding steps until your entire play is complete
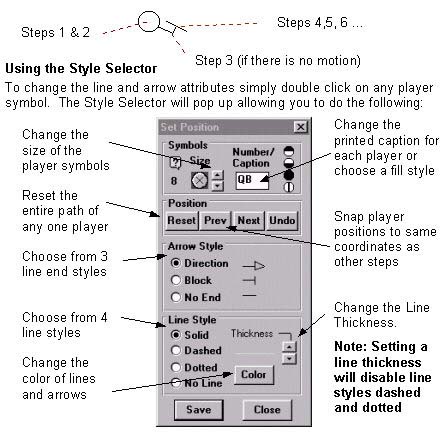
Lines and arrows will be automatically generated based on the x,y coordinates of each step. To preview the line and arrow display on screen press the Line button.

Probably the most difficult skill to master is creating reach blocks. Because the block is always perpendicular to the last line segment it is sometimes difficult to get the block angle exactly the way you want it.
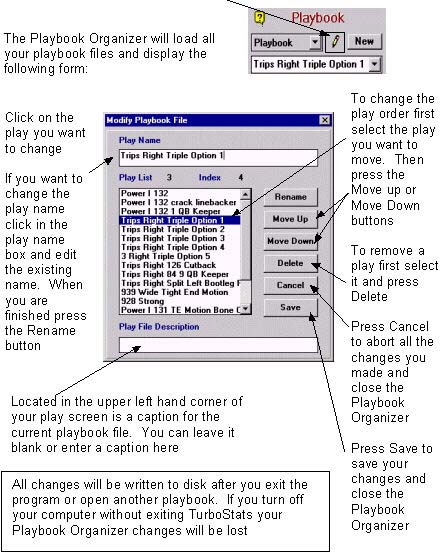
As you add plays you will want to reorganize your playbook file. You might want to rename plays or even delete them. The Playbook Organizer is designed to do just that. Press the pencil and eraser icon to popup the Playbook Organizer.
Now that you have created your animated playbook the next step is to get a hard copy. Using the Printing Selector you can print up to 9 plays on one page. You can also print one play step by step.

Printing Error: There may not be enough memory to print in High Quality Mode. Solution: This could be one of several issues. Try turning off the [x] High Quality Printing option. That option will remove the lines under the player symbols to make a sharper printout. Some printers don't have enough memory to do this. If this does not fix the problem there may be a problem with the play. Try printing a different play.
Copyright © 1999-2000 TurboStats Software Company